Fresh from all my “right side of the brain” wannabe-artistic efforts of the past couple of weeks, I thought I’d give old left-brain a bit of an outing and let him record how he [finally!] managed to get Debian Wheezy booting as the sole OS on an old MacBook Pro 4,1.
Disclaimer: As everything Linux-related I attempt seems to comprise at least twice as much luck, voodoo and chicken entrail interpretation as it does ‘knowing-what-the-fuck-I’m-doing’, this is very much one of those YMMV kind of posts. However it worked for me, where none of the dozens of learned Linux-expert discourses I read online did. So here goes:
[I’m going to try and keep this short as, if I ran through every permutation that I tried which didn’t work, this post would end up long enough to publish in ‘monthly installments which build into a complete encyclopaedia’]
Most of the literature on the subject that I’ve found on the web made my brain melt with discussions of the pros and cons of various partitioning systems and the intricacies of using Grub vs EFI vs Grub-PC vs Grub-EFI vs MBR in order to try and get Linux to boot on mac hardware in the first place.
I must have carried out about a dozen installations, using various combinations of those various bootloaders, installed to various partitions and using various partitioning schemes and the most I managed to achieve was being able to fairly consistently boot into a Debian CLI as long as I remembered to edit the Grub boot options beforehand to add "text" and "nomodeset" to the options --otherwise I just got hung up at a blank screen.
Once into a CLI I was able to login and install software but was unable to boot into a desktop environment as "startx" would just bomb out with errors about “no screens found”. It did that every time, apart from once when I must have accidentally moved a chicken entrail into a favourable position and I managed to drop into a desktop environment, albeit the fallback simple Gnome desktop and not the shiny new one.
Anyway, I was never again able to find the random series of mouseclicks and menu options which resulted in that brief moment of glory, so perhaps I just hallucinated the whole thing.
Well, enough of what didn’t bear fruit. Anyone who’s read thus far wants to know what mystical voodoo I performed in order to finally get it to work. Here’s the magic formula that cracked it for me.
-
Instead of booting from the Debian Wheezy installer DVD, as I had been previously, I booted from the Debian Wheezy Live DVD image [amd-64 bit version], burnt to DVD using Toast --and then ran the installer from that. In theory this should amount to the same thing as installing from the installer DVD or burning the DVD using OSX Disc Utility, but remember Linux = Voodoo, so who knows? It might have made a difference.
-
In all my previous attempts, I’d left the original OSX Recovery Volume intact, so I’d have something which I could boot into if everything went tits-up. I’d then manually partitioned up the rest of the hard drive into various combinations of Linux partitions.
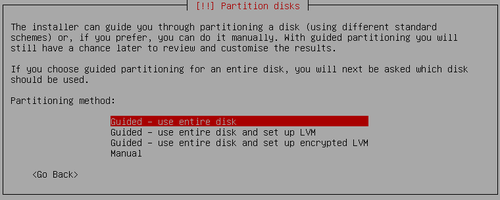
By the time this attempt swung around, I was so bored with going through all this partitioning crap all the time that I just opted for the “Guided --use entire disc” option, which would reformat the entire HD and overwrite the OSX Recovery partition --thus removing my last safety net, should I brick the comp.

On the next screen I selected the ‘…for advanced users’ option which partitioned the drive up into separate boot, /, home, usr and swap partitions and just accepted the default options. I was expecting this to be yet another failure so I just OK’d the installer’s suggestions for the sizes of all of these, without paying too much attention to either the nitty or the gritty.
-
After running through the rest of the installation again, I let the installer choose where to install the Grub bootloader, based on its assumption of Debian being “the only OS” on the computer. Pretty much all the HOW-TOs I’d read before had stressed that you really shouldn’t do this, but should manually install Grub to one, other or sometimes more than one of your dedicated Linux partitions, so as not to destroy Apple’s EFI partition. I think therefore that Grub probably just installed to '/dev/sda' rather than one of the partitions.
-
After rebooting, I was faced with the dreaded flashing folder with a question mark, which is Apple hardware’s way of telling you you’ve knackered your computer and left your hard drive bereft of anything remotely resembling a bootable OS. It seemed that the dire warnings about not using a ‘whole disc’ partitioning scheme were right and I’d bricked my MBP!

-
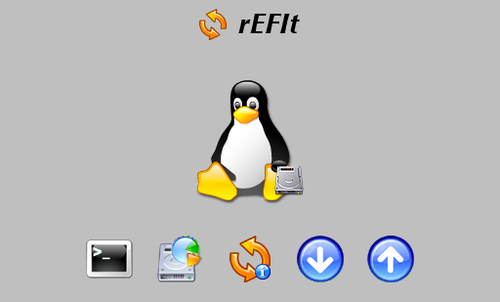
Just on the off-chance though, I downloaded the rEFIt 0.14 6.5M Mac disk image to see if I could at least boot into the rEFIT menu and have something to look at, apart from that bloody flashing folder. This I was able to do and was presented with a Linux penguin icon as my one and only boot option.

I chose this and rEFIt dumped me into me to a plain greyed-out screen with a greyed-out penguin --which just sat there doing bugger all and effectively froze up the comp.
-
I force powered-down and then rebooted from the rEFIt DVD again. This time, I chose the rEFIt Partitioning Tool from the list of small icons underneath the boot volume selection and let it do it’s thing. NOTE: I didn’t actually install rEFIt itself. I just allowed its partitioning tool to try and ‘fix’ whatever balls-up the Debian installer had made of my hard drive.

The partitioning tool did ‘something’ but then complained that ‘something’ else hadn’t worked. Sorry, I know that was nearly as vague as one of my mammy’s descriptions when she’s asking me to troubleshoot her computer problems, but by this time I was ready to give up and bugger off to bed, so I wasn’t really paying too much attention at all.
-
Anyway, I rebooted again, popped out the rEFIt DVD and --much to my surprise-- the comp booted initially to Grub and then to the Debian startup options menu. Heroically, I opted for the full-cream, non-rescue version and, Lo’ and Behold my MBP booted effortlessy into Debian Wheezy and its shiny new Gnome 3 desktop.
Aware that we’ve ‘been there done that’ before, I didn’t get too excited --just tinkered around a bit and then tried rebooting. It worked again!… and again!… and again!
So it seems that I have successfully managed to crack single-booting Debian on the MacBook Pro 4,1, without using any fancy boot-chaining, custom Grub tweaking or having to boot via the rEFIt menu each time. I am therefore either a Linux guru of Torvaldsian proportions, or am such a fuckwitt that I’ve just done something the really straightforward and correct way, after previously spending several weeks fruitlessly trying to do it the really complicated and wrong way.
My money’s on Option 2, but what the hey. The proof of the pudding and all thon…
[Apologies for the crappy mobile phone camera work, but you get the [wobbly!] picture. Approx two minutes [including clicking buttons and typing in password] from clicking ‘Restart’ to having a usable Gnome 3 desktop again. Not too bad and actually quicker than the MBP was running OSX Mountain Lion.]
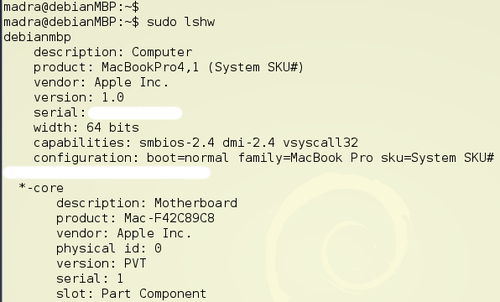
I realised after shooting the above that I’d not included anything in the frame that actually showed that this was Debian booting on a MBP and not just any old generic PC, so here is the output of lshw, to prove the veracity of my outlandish claims.

Now for several more weeks tinkering and adjusting to try and get everything tweaked to my satisfaction. Out of the box, I’ve been pretty impressed that a lot of things just work: hardware keys for screen brightness, volume, etc, trackpad, monitor colour calibration. However I’ve still to try and get WiFi up and running and I’ve noticed that a few settings don’t seem to ‘stick’ after a reboot --for example Bluetooth is always on at startup, even though I keep turning it off.
